
How to Dump PS2 BIOS File from Your console Safely (Works on Any Model)
If you want to play PlayStation 2 games on your computer or phone using emulators like PCSX2 or AetherSX2, you’ll need a special file called the PS2 BIOS. Instead of downloading BIOS files from random websites which can be risky or unreliable you can easily get the BIOS directly from your own PS2 console or you can get it at pcsx2bios.com It’s safer, cleaner, and works perfectly with any emulator.
In this guide, we’ll show you how to dump the BIOS file safely and easily from any PS2 model, even if you’re a beginner. We’ve included step-by-step instructions with simple tools, so you can get started in just a few minutes.
Let’s get started and set up your emulator the right way!
What Is a PS2 BIOS File ?
A PS2 BIOS file is a small system file that acts as the brain of the PlayStation 2 console. BIOS stands for Basic Input/Output System, and it’s what the PS2 uses to boot up, read discs, and communicate with games and hardware.
When you use a PS2 emulator (like PCSX2) to play PS2 games on your computer or phone, the emulator needs the BIOS file to function properly just like the real console does.
Why You Need a PS2 BIOS File:
A PS2 BIOS file is essential for accurately emulating the PlayStation 2 system. It replicates the console’s original startup process, allowing your emulator to behave just like real PS2 hardware.
Requirements Before Dumping ps2 Bios File on Modded & Unmodded PS2 Console ?
Before you start copying the BIOS from your PS2, make sure you have all the right things. The tools you need are a little different depending on whether your PS2 is modded or unmodded. Here’s a simple list for both:
For a Modded PS2 (Free McBoot or Modchip)
If your PS2 is already modded or has Free McBoot:
- A memory card with Free McBoot or a modchip installed
- A USB flash drive (make sure it’s formatted to FAT32)
- The BIOS Dumper file
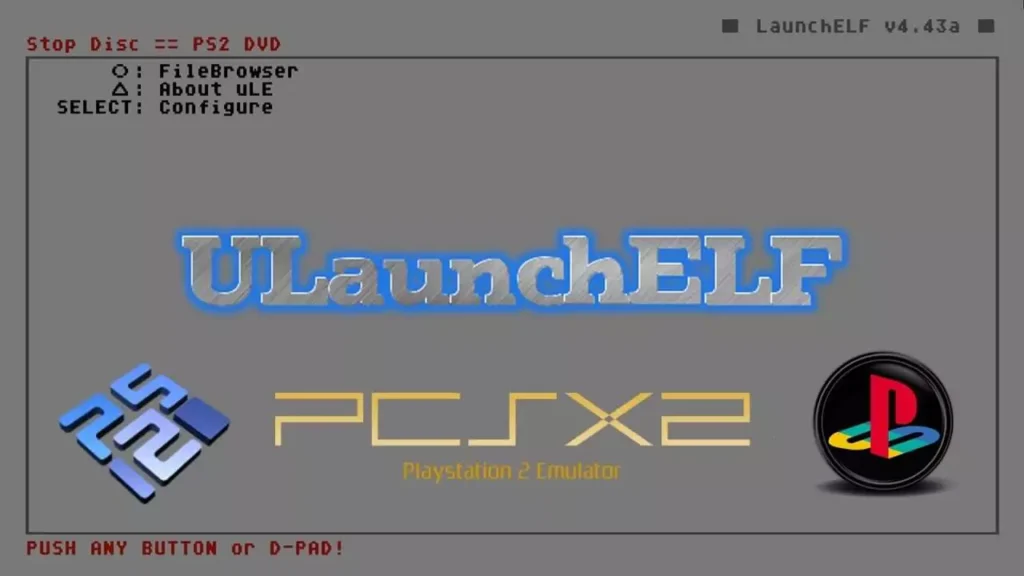
- uLaunchELF (comes with Free McBoot)
Good news: If you already have Free McBoot, this is the easiest method.
For an Unmodded PS2 (Original Console)
If your PS2 has no mods or hacks, you’ll need:
- A regular PS2 memory card
- A FAT32-formatted USB drive
- A method to run apps (like Swap Magic, disc swap trick, or FreeDVDBoot)
- The BIOS Dumper file
- uLaunchELF (you’ll load this using a trick or disc)
Optional: Some models can also use a network adapter or hard drive for extra storage.
Method 1: How to Dump BIOS from a Modded PS2 (Easy Method)
If your PS2 is already modded with Free McBoot (FMCB), you’re in luck this is the easiest and safest way to dump your BIOS. No need for disc swapping, tricky setups, or extra hardware. Just follow these simple steps, and you’ll have your BIOS file ready in no time.
Step-by-Step: Dumping BIOS from an modded PS2
Let’s go through the process slowly and clearly:
Step 1: Check If Your PS2 Has Free McBoot
- Turn on your PS2 with the memory card inserted.
- If you see a custom menu (instead of the regular PS2 browser), you’re using Free McBoot.
- You might also see “uLaunchELF” or “Free McBoot” on the screen that confirms it’s installed.
No FMCB? You’ll need to mod your console first or try the unmodded method instead.
Step 2: Download the Required Tools
Here’s what you need (don’t worry, they’re small files):
- BIOS Dumper ELF file : This is the tool that extracts your BIOS.
- uLaunchELF : It comes preloaded with Free McBoot, so you probably already have it.
You can get the BIOS Dumper tool from trusted sources.
Step 3: Dump the BIOS to USB Step-by-Step
- Format your USB to FAT32 if it’s not already. (Important!)
- Copy the BIOS Dumper ELF file onto the USB.
- Plug the USB into the front USB port of your PS2.
- Turn on your PS2 with the FMCB memory card inserted.
- From the Free McBoot menu, launch uLaunchELF.
- Navigate to your USB drive and select the BIOS Dumper ELF file.
- The tool will start dumping your BIOS. It may take a few minutes.
- The BIOS file will be saved to your USB automatically.
- Once it’s done, remove the USB and plug it into your PC.
Step 4: Check Your Dumped BIOS
On your computer:
- The BIOS file should be named something like scphXXXXX.bin.
- File size should be around 4MB (usually 4,194,304 bytes)
- Keep it safe it’s the heart of your PS2 emulation.
Method 2: Dump BIOS from an Unmodded PS2 (Harder but Still Possible)
Not everyone has a modded PlayStation 2 and that’s totally okay. If your console isn’t running Free McBoot (FMCB), you can still dump your BIOS. It just takes a few more steps and a bit of patience.
This method is for people who have an unmodded PS2, and it involves using a disc trick or a special tool to load the BIOS dumper. It’s a little trickier, but we’ll break it down so anyone can do it safely.
Step-by-Step: Dumping BIOS from an Unmodded PS2
Let’s go through the process slowly and clearly:
1. Get the BIOS Dumper on Your USB Drive
Download the BIOS dumper .ELF file and place it on your FAT32 USB drive. It should be in the root folder (not inside any subfolder) so your PS2 can find it easily.
2. Boot uLaunchELF Using a Trick
This is the trickiest part. You need to launch uLaunchELF without Free McBoot:
• If you have Swap Magic, use it to load the ELF file.
• If not, try the disc swap trick this means starting a real PS2 game, then quickly swapping in a disc with the uLaunchELF ELF burned on it.
• Some older PS2s may work with FreeDVDBoot, which loads ELF files straight from a burned DVD.
Tip: Search online for “FreeDVDBoot compatibility list” to check if your model works.
3. Run the BIOS Dumper
Once uLaunchELF is running, use it to find and launch the BIOS dumper tool from your USB drive.
4. Dump the BIOS to USB
Follow the on-screen steps in the BIOS dumper. It will extract the BIOS and save it directly to your USB stick.
5. Move the File to Your PC
Remove the USB, plug it into your computer, and copy the BIOS file. It should be around 4MB and end with .bin.
Bonus Tip: If you want to skip these steps, you can get the right BIOS from our PS2 BIOS download page tested and ready for PCSX2 and AetherSX2.
How to Use the BIOS with an Emulator (PCSX2 or AetherSX2)?
Once you’ve dumped your BIOS file, here’s how to use it to start playing PS2 games on your emulator:
Also Read:
7 Free PS2 Emulators for PC (Windows Mac and iOS) in 2025
Step 1: Move the BIOS File to the Right Folder
• Take the .bin BIOS file (usually around 4MB) from your USB or downloads folder.
• Copy it into the BIOS folder of your emulator:
o PCSX2:
Documents > PCSX2 > bios (or your custom install folder)
o AetherSX2 (Android):
Internal Storage > AetherSX2 > bios
Step 2: Set It Up in the Emulator
PCSX2:
- Open PCSX2.
- Go to Settings > BIOS Selector.
- Choose your dumped BIOS from the list.
- Save or apply settings.
AetherSX2:
- Open the app.
- In the Settings, tap BIOS.
- Browse and select your .bin file.
- It will automatically load and save.
Step 3: Start Playing PS2 Games!
That’s it! Once the BIOS is set, you can load your favorite PS2 games and play them just like the old days.
Need BIOS files already ready-to-use? Download from our PS2 BIOS section safe and fast.
Tips for Success (So You Don’t Mess Things Up)
Here are a few things you should always do to make sure your BIOS dump works perfectly the first time:
1. Format USB as FAT32
Before starting, make sure your USB drive is formatted to FAT32. This is important because the PS2 won’t detect drives in other formats like exFAT or NTFS.
2. Don’t Rename the BIOS File
After dumping, the BIOS file will have a name like SCPH-XXXX.bin. Leave it as it is renaming it might cause issues when loading it in the emulator.
3. Keep a Backup Copy
Save a copy of your BIOS file on your PC or cloud storage. If anything goes wrong, you’ll still have it safe.
4. Test the File Before Deleting
Before removing it from your USB, load it in your emulator first (PCSX2 or AetherSX2) to make sure it works properly.
Legal Note (Very Important)
Before you use a PS2 BIOS with any emulator, here’s what you need to know to stay safe and legal:
Only Use BIOS from Your Own Console
You’re allowed to dump and use the BIOS only from your personal PS2. That’s legal because you already own the hardware.
No Sharing with Others
Even if you dump your BIOS, don’t send it to friends. BIOS files are tied to hardware and sharing them online is the same as piracy.
Want to keep it simple and safe? Just follow this guide and dump it yourself. It’s not hard and it’s the right way to do it.
Conclusion
Dumping your PS2 BIOS might seem confusing at first, but as you’ve seen, it’s something anyone can do with a little guidance. Whether you’re using a modded console with Free McBoot or an unmodded PS2 with the disc swap method, both options work if you follow the right steps.
The modded method is easier and faster, but even if your console isn’t modded, you can still get the job done with some extra effort. Now that you have your BIOS file, all you need to do is place it in your emulator’s BIOS folder like PCSX2 or AetherSX2 set it up in the settings, and you’re ready to start playing your favorite PS2 games legally. Always remember to use the BIOS from your own console and avoid downloading it from the internet.
Can I use someone else’s PS2 BIOS if I don’t have a console?
No. Legally, you’re only allowed to use a PS2 BIOS dumped from your own console. Using or sharing BIOS files downloaded from the internet is considered copyright infringement.
What happens if my BIOS file is corrupted or too small?
A valid PS2 BIOS file is usually around 4MB (4,194,304 bytes). If your file is smaller or emulator errors appear, your dump may have failed. Try re-dumping the BIOS with a clean USB and follow the steps carefully.
Will dumping the BIOS damage my PS2 console?
No. Dumping the BIOS is a read-only process. It doesn’t modify, hack, or harm your PS2 in any way. It simply copies data from your console’s internal memory.
Can I use this BIOS on both PCSX2 and AetherSX2?
Yes! Once dumped, the same BIOS file works on both PCSX2 (Windows/Mac/Linux) and AetherSX2 (Android) just copy it into each emulator’s BIOS folder.
Do I need to redump BIOS if I switch emulators or devices?
Not at all. One good BIOS dump is enough you can use the same .bin file across any emulator that supports PS2 games. Just make sure to keep a backup in a safe location.
Is FreeDVDBoot safe to use on unmodded PS2s?
Yes, if your console model is compatible. It’s a non-invasive software method that boots homebrew from a burned DVD, letting you run tools like uLaunchELF without hardware mods.
For more information, you can see this youtube video.


3 Comments